Text

Handwoven Modern and Traditional Reed Baskets by Rachel Starry
Welcome to Turquoise and Twill, where you'll find a gallery of my previous work as well as previews of works-in-progress and other basket-related fun. To see what I currently have in stock, check out my Etsy shop, TurquoiseAndTwill!
Showing posts with label Etsy listings. Show all posts

Tuesday, March 24, 2015

Traditional Choctaw Basketry


One of the most interesting traditional basket designs I have ever encountered is the pointed-bottom wall pouch that is historically associated with the Choctaw tribes of the southeastern United States. Today there are three nations of Choctaw Native Americans, living in Oklahoma, Louisiana, and Mississippi. These tribes have a rich history of basket-weaving, and several distinct styles of Choctaw baskets exist. 

Traditional Choctaw baskets were (and still are) woven from river cane, which is harvested and then processed into strands of cane fibers. These fibers were sometimes dyed in shades of black/brown, red, and yellow, originally using plant-based dyes and pastes from species native to the Southeast, such as black walnut, red oak, and black gum trees. Today most Choctaw baskets are made using commercial dyes, which I also use to dye the reed for my baskets (to find out more about my dying process, check out the tutorial I posted recently). 

Large wall pouch basket (front)
Large Wall Pouch (front)
Large wall pouch basket (back)
Large Wall Pouch (back)


I found a pattern for the type of basket known as taposhake chufa (“pointed basket”) in the Choctaw language, and decided to make a few in different sizes and colors. I especially love how the larger one turned out (images above). It’s such an eye-catching shape, and because of the weaving method, the colored reed runs horizontally on one side and vertically on the other in the lower part of the basket. Knowing that this style of basket has a long and interesting history makes it even more exciting, and I hope to make more like it in the future!

"Pointed" basket (from ChoctawNationCulture)

Other styles of Choctaw baskets include pack baskets, “elbow” baskets (named for their shape), and lidded baskets. One of the ways to distinguish Choctaw baskets from other river cane baskets is by their distinctive wrapped rim and handles, which you can see on some of the baskets shown here. Another distinctive feature of Choctaw basket design is that many baskets are double-walled, with different designs visible on the inner and outer walls, and all of the Choctaw baskets that I've seen are plaited (plaiting is a weaving method where the horizontal and vertical elements are spaced evenly). 


Choctaw elbow basket

Elbow basket (from AccessGenealogy)


For more information on Choctaw history and culture, especially the tribes’ rich basket-weaving traditions, see Culture and Customs of the Choctaw Indians, by Donna Akers (2013), as well as the websites listed below.

Tuesday, March 17, 2015

New Etsy Listings!

I've finished a few more projects and posted some new listings on Etsy. These include the two Choctaw pouches I mentioned in an earlier post as well as a custom order and some patterns. The Color Scrap Basket pattern (which I posted free of charge for blog readers!) is now available to purchase, along with the basket that is shown in the pattern. Tomorrow I'll be posting a miniature version of the Appalachian basket I've made in the past, together with the pattern for that basket as well!

I sold the larger of the Shaker cheese baskets and have requests for more, so that's getting added to the list of baskets to make soon. Stay tuned for the colorful tray and the two chevron twill baskets I've promised - they're coming soon.

Large Choctaw Pouch (front)
(back)
Small Choctaw Pouch (front)
(back)


Mini Appalachian Basket
Custom Bathroom Basket for Nickie

Color Scrap Basket

Thursday, February 26, 2015

Behind the Scenes - Making the Basket behind the Banner

When I first thought of the name "Turquoise and Twill" for my Etsy shop, I immediately knew what kind of banner I wanted to make for the storefront. The background would be a detail of a twill-pattern basket stained dark brown, overlaid with the shop name in a bold, cursive script in turquoise. There was just one problem... I hadn't recently made a brown twill basket. So making one to photograph for the banner got put at the top of my to-do list!


Back-story aside, the main purpose of this post is to give you a glimpse into the basket creation process, and the basket I'm using to show the basic stages of that process is the basket behind the shop banner. There are basically 6 stages that every basket goes through, from the moment I sit down to sketch it out to when I stain and finish it.


Stage 1: Design & Material Prep

I knew I wanted to make a market basket in the traditional style, and I knew it had to be twill. I also remembered that I had an ash handle with an 8" spread lying around (decisions about basket design are often made based on the materials I have on-hand!). After I dug up the handle I got started calculating the dimensions for an 8" wide market basket.

The finished rim measurements of a basket are always a bit larger than the dimensions of the base, so I calculated how many 1/4" stakes I would need to make a 6x10" rectangular base (about 18x28). The final step in this stage was to get out my materials and cut the reed I would need to weave the base. If I was making a basket with colored reed, dying the reed would be an additional part of the material prep.


Stage 2: Weaving the Base & Locking Row

The base was woven in a 2x2 twill pattern, which gives the basket a very solid, filled bottom. When the base was finished, I twined a quick locking row to ensure that the base stayed rectangular. Especially with twill bases, the corners like to slip, and this row prevents that. You can see the locking row in the second picture below.


Stage 3: Weaving the Walls

The walls were woven in the same 2x2 twill pattern. It took about 16 rows to get to the height I was aiming for; it's more important for the proportions to feel right than to have any exact ratio, unless you're working with a repeating pattern.


I always stop after the first few rows and let them dry before continuing, because the first few rows are always a bit uneven and I like to pack them down before weaving the rest of the walls. Reed shrinks a bit when it dries, so it's a good idea to let the basket dry before packing the rows to remove any gaps or unevenness.


Stage 4: Cut & Tuck

This stage is pretty self-explanatory: stakes that end up on the inside of the basket get cut while stakes on the outside get tucked over to secure the top row in place.


Stage 5: Lashing the Rim

Rimming the basket can be very time-consuming, depending on the size of the basket. This one took about an hour to rim. The first step is to cut the rim pieces; for this one, I used 3/8" flat oval reed. The pieces are cut with about 1" of overlap; then those end pieces get shaved down so that the overlapping section is the same thickness as the rest of the rim.


Stage 6: Staining

To create a traditional finish for the basket, I stained it a dark walnut brown with standard wood stain. This color imitates the look of early American baskets made from brown ash splint, which darkens with age.

The finished basket!

That's it! From start to finish, it took about 6.5 hours to make this basket, and since my goal is to create both beautiful and functional baskets, I pay close attention to detail at every stage so that all my baskets are made to the highest standards!

Sunday, February 22, 2015

Shaker Baskets - A Brief History

The Shakers were a splinter sect of Quakers that was formed in the 18th century in England. Several Shaker communities were founded in the American colonies in the late 18th and early 19th centuries, most famously at Mount Lebanon, NY. The Shakers were known for their simple lifestyles and religious beliefs, being a pacifist society in which men and women shared equal responsibility in the church hierarchy. They are also known for their architecture, furniture, and crafts, among which are the many styles of baskets that can be found today in museums and private collections.

http://www.journalofantiques.com/images30/f2.JPG
Authentic Shaker Cheese Baskets (www.journalofantiques.com)
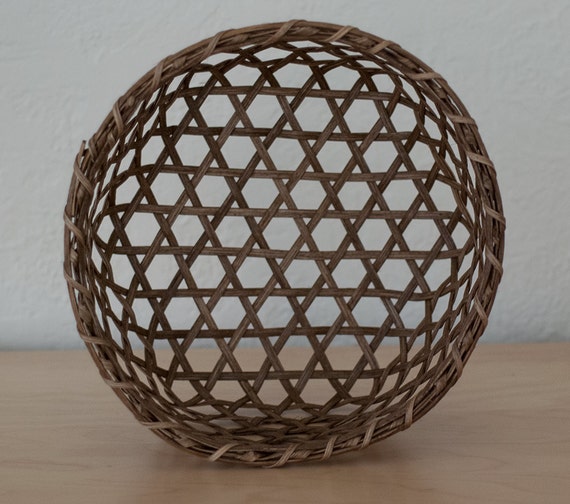
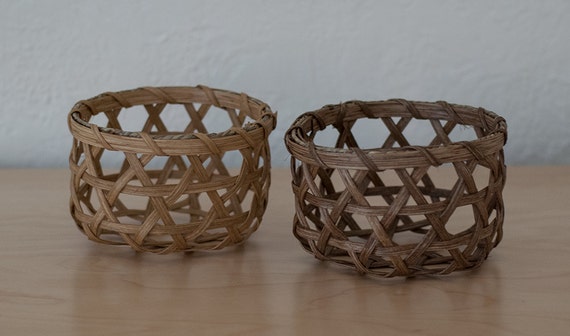
One of my favorite baskets to make is in the style known as the Shaker cheese basket. Historically, this type of basket was used in the cheese production process to drain the curds and separate them from the whey. It is made using a traditional hexagonal weave, which can be manipulated to create many variations in shape and size. I prefer to make them in a form that begins with a hexagonal base and rises with straight walls to a round rim, either with or without a handle.

In the image above, you can see that a pair of runners has been lashed to the bottom of each basket; these were used to hold the baskets to a cheese ladder. Below are examples of two different sizes of Shaker cheese baskets that I've made.

Handwoven Shaker Cheese Basket - Traditional Early American Hexagonal Weave Basket - Dark Walnut Brown Stain
Shaker Cheese Basket
Handwoven Miniature Shaker Cheese Basket - Traditional Early American Hexagonal Weave Basket - Light Golden Oak and Dark Walnut Brown Stain
Miniature Shaker Cheese Baskets
Several other styles of Shaker baskets exist, including types that were used for work in the field (like wash baskets and fruit baskets) and more decorative types used within the home (known as "fancy" baskets, often in a shape known as a Shaker cat's head basket). For more information on Shaker baskets, check out Shaker Baskets (1988) by Martha Wetherbee and Nathan Taylor, or Basketry: The Shaker Tradition (1990) by John McGuire. I've also included a list of several websites at the end of this post that provide more information and pictures.

http://www.journalofantiques.com/images30/f1.JPG
Shaker Wash Baskets (www.journalofantiques.com)
https://s-media-cache-ak0.pinimg.com/236x/ec/47/d2/ec47d2f86fe49599a135922d589a3f68.jpg
Shaker Herb Drying Basket (www.pinterest.com)
Two distinctive features of authentic Shaker baskets are their rims and handles, which are often carved from the same piece of wood and lashed together with the same brown ash or white oak splint in which the rest of the basket is woven. These baskets display incredibly fine craftsmanship using hand-split and hand-carved local materials and are beautiful examples of early American basketry!

http://www.journalofantiques.com/images30/f12.JPG
Typical Shaker Handle and Rim Design (www.journalofantiques.com)

http://shakerworkshops.com/resources/who-are-the-shakers/shaker-fancy-baskets/
http://shakerheritage.wordpress.com/2012/03/28/the-shaker-basket-making-tradition/
http://www.journalofantiques.com/Jan04/featurejan04.htm

Saturday, February 21, 2015

The Shop Doors Open!

This is it - the inaugural post!  After a few weeks of intense preparations, which included compiling lists of articles that compile lists of articles on everything you could possibly want to know about selling on Etsy, I've finally opened the doors of my Etsy shop, TurquoiseAndTwill.  A few listings went up today, including the large and small versions of my take on the traditional Shaker cheese basket (a popular early American basket that uses hexagonal weave).

There's still so much to be done, but I have been busy on Pinterest where I've organized several boards on topics like basket storage ideas, decorating with baskets, gift basket inspiration, historical baskets, and eclectic home decor. I'm hoping to use this blog - and, by extension, my pinboards and Facebook page - as a place to showcase my past and current work as well as give insight into my creative process, share interesting tidbits on the history of basket-making, and post basket patterns and tutorials. It's a daunting task to be setting out on, but I'm hopeful that things will start coming together soon!